How to Draw a Corgi in 4 Easy Steps
Yes, yes I know, drawing can be hard sometimes. Especially when you are trying to learn how to draw a cartoon corgi. They’re usually short, kinda fat, and definitely goofy looking. So getting them to look just right can be down right infuriating!!
But don’t worry…
Because In this tutorial, I’ll show you how to draw a corgi in 4 easy steps, even if you’ve never drawn a dog before.
Keep reading and follow this step-by-step guide to learn how to do this easy corgi drawing, and get one step closer to becoming the cartoonist you’ve always wanted to be!!
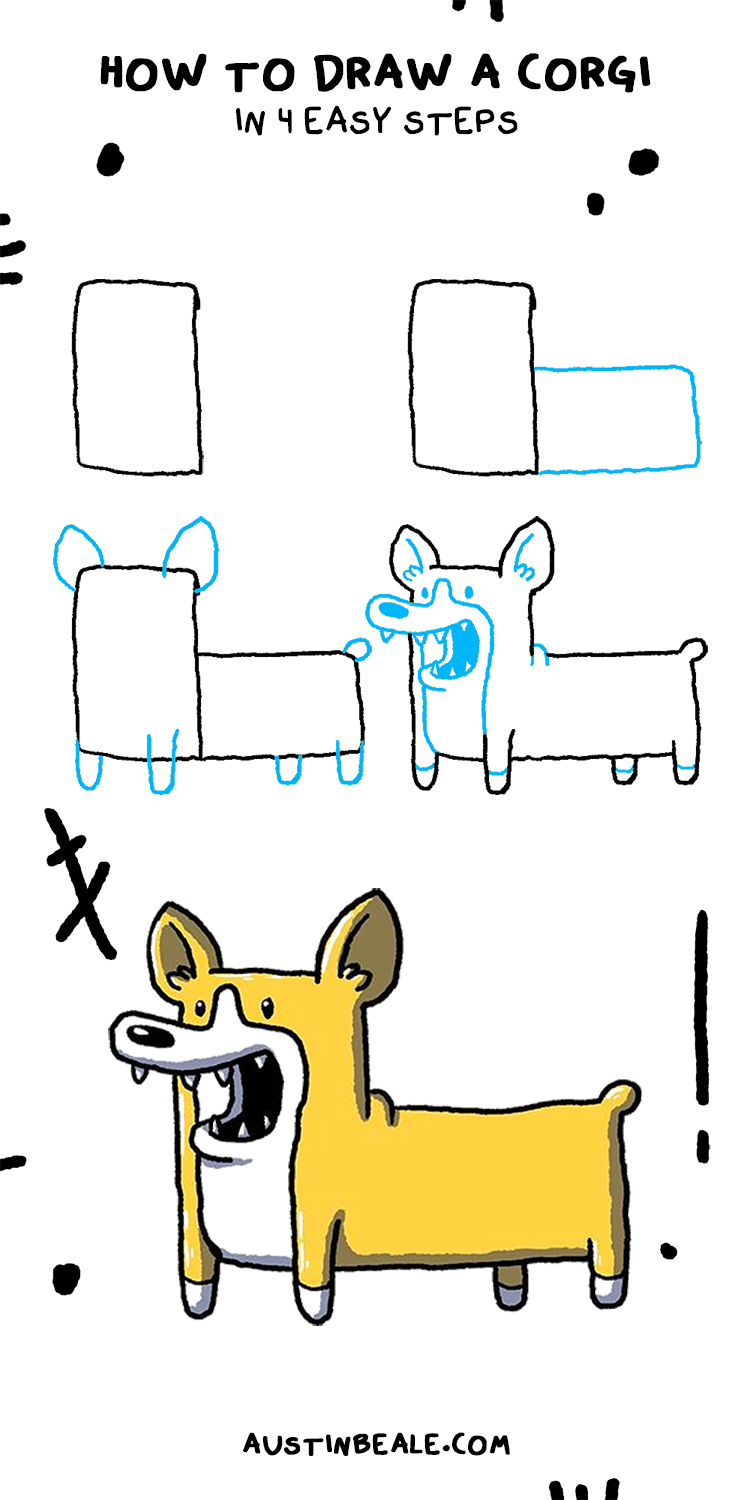
The final corgi drawing:

Step 1: Draw The Corgi Head
The first thing you’re gonna wanna do is draw a tall rectangle. This will end up being his head and neck. Corgis are pretty short and fat, so keep that in mind as you draw. However you change the shape how ever you see fit.

Step 2: Draw a Short the Corgi Body
You already drew a rectangle in step 1. So, step 2 is gonna be a breeze for you. Just draw a short wide rectangle coming off back of the first rectangle. This new rectangle will be the corgis body.

Step 3: Add the Ears, Legs, and Tail
Now we’ve gotta make these rectangles look like a corgi. I think some legs, ears, and a tail will be a huge step in the right direction. So lets add those now!!
A corgi tail is just like a rabbits tail, just a little fluff ball. So, for the tail I just drew a circle where his tail should go.
The ears are basically rounded triangles. I stuck those at the top of his head so he can hear. Corgis usually have pointy ears but this is you’re corgi so if you want him to have floppy ears go for it!!
I always go with the noodle legs so I don’t have to worry about feet or toes. Makes them much easier to draw. Make sure the back ones get over lapped by his body to add depth.

Step 4: Draw the Corgi’s Face
In the Final step you are going to draw the corgis nose and mouth. The nose is a hotdog shape and I chose to give him an open mouth. You can add a tongue hanging out our whatever else you can think of.
After the nose and mouth is drawn I usually erase all the unnecessary lines, and add the lines the separate white and orange fur.
Then I drew little dots for eyes, and added a little fat roll behind his neck.

Bonus step: Color the Corgi Drawing
This step is completely optional. If your feeling adventurous go ahead and color your Corgi drawing and make him look real nice.

Well I hope you enjoyed this and learned something form it. Maybe you’re a professional corgi drawer now, and you’re drawing corgis for the queen, that would be cool.
If you enjoyed this tutorial, you might also like learning how to draw a dog, how to draw a fat cat, how to draw a walrus, or even how to draw a chicken.
If you’re really into my art and wanna help me pay my rent go check out my store and buy some stuff.
Click this if you don’t want to read:


